Embed Excel in Word
This article will demonstrate how to programmatically embed a SpreadsheetML spread sheet in to a Wordprocessing ML document using Content Controls, the OpenXML SDK 2 and Visual Studio 2010. We have used Microsoft Office for the initial file creation, however this approach is applicable to any Open XML format file and so the code from this article could be combined with that from other articles such as those demonstrating OpenXML document generation.
We will start with a spread sheet that contains estimates from different contractors for a job. We’re going to embed this spread sheet in to a word document so that it will appear as a report that we can submit to our manager for approval.
Below are the things that we need to do:
· Create a WordprocessingML document that will host the embedded SpreadsheetML spread sheet object
· Examine the included spread sheet to embed.
· Create a windows application that will do the embedding. This is a ‘test-harness’ type application that will host our demonstration code.
· Test the application
Before starting, make sure that you got OpenXML SDK 2.0 installed. If you haven’t, Click here and download the installer.
Create a WordprocessingML document in Word 2010
We’ll begin by creating a WordprocessingML document that will ultimately host the embedded Excel document. TO do this we’ll be using content controls and as such we’ll need to enable the developer toolbar within Word.
1.) Open Word 2010 and create a new document.
2.) Enable the developer toolbar in Word 2010. To do this:
a. Click on File tab and select Options.

b. In the Word Options window, click on the Customize Ribbon tab. On the right hand side, you will find a list of all the tabs in Word 2010. Tick Developer checkbox and click on the OK button.
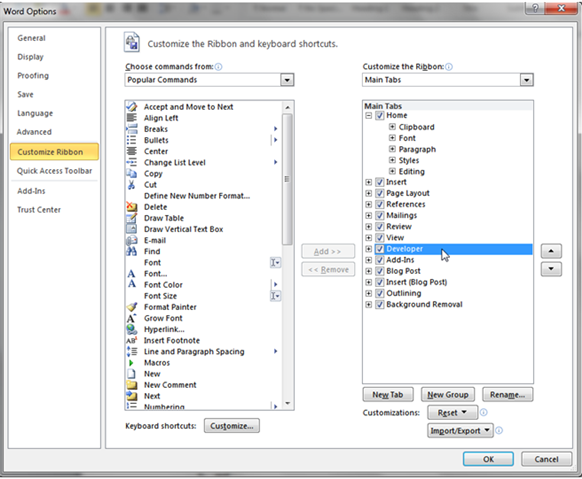
c. You’ll see that the developer tab is now available in Word 2010.

3.) Type a heading for your report. Below is an example:

4.) Add a Building Block Gallery Content Control in to the document. To do this:
a. In the Developer tab, drag a Building Block Gallery Content Control underneath the heading for your report.
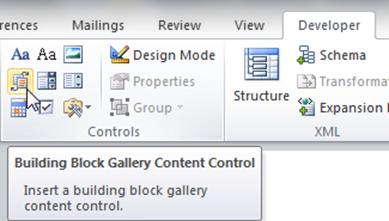
b. Click the Building Block Gallery Content Control that you just dragged in to the document and press the properties button under in the Controls section of the Developer tab.
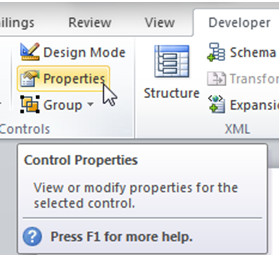
c. The Properties window will appear. In the Title and Tag fields type in EmbedObject.

d. Save the document as Template.docx.
e. Open up Open XML SDK 2.0 Productivity Tool which is found in the Microsoft Office Open XML SDK 2.0 under All Programs.
f. Drag and drop Template.docx in the Document Explorer pane to see the actual mark-up that was generated.
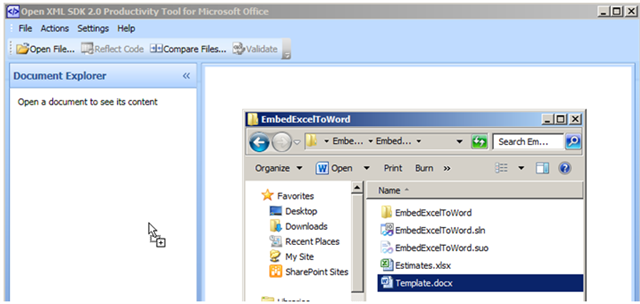
g. The basic structure of the main document part in a basic WordprocessingML document contains the following:
<w:document>
<w:body>
<w:p/>
</w:body>
</w:document>
h. In the Document Explorer navigate to w:document element
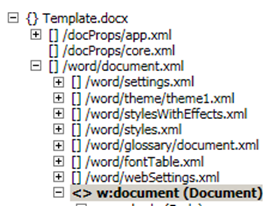
i. Underneath the tag, look for the w:sdt element.
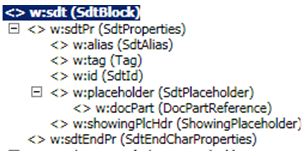
SdtBlock element specifies the presence of a structured document tag around one or more block-level structures (paragraphs, tables, etc.). The two child elements of this element shall be used to specify the properties and content of the current structured document tag via the sdtPr and sdtContent elements, respectively
SdtId element specifies a unique numerical ID for the parent structured document tag.
alias element specifies the friendly name associated with the current structured document tag. The string representing the friendly name shall be stored on this element’s val attribute.
Tag element specifies a programmatic tag associated with the current structured document tag. A programmatic tag is an arbitrary string which applications can associate with a structured document tag in order to identify it without providing a visible friendly name.
SdtPlaceholder element specifies the placeholder text which should be displayed when this structured document tag’s run contents are empty, the associated mapped XML element is empty as specified via the dataBinding element
docPart element specifies the name of the document part which shall be displayed in the parent structured document tag when its run contents are empty
Examine the included spread sheet to embed:
An existing spreadsheet has been included in the resources downloaded for this article. In this section we’ll examine this existing spreadsheet noting things such as the formulas that have been used.
1.) Open the spread sheet.
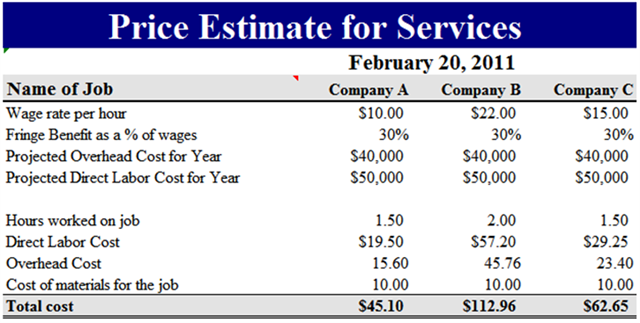
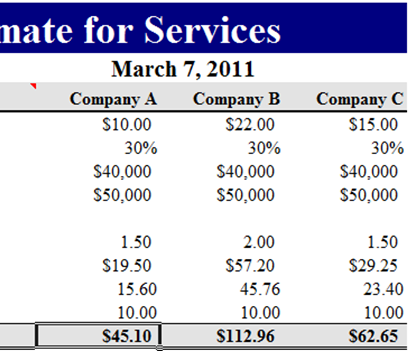
2.) Note that the total cost is driven by a formula
3.) Close the spread sheet.
Create a windows application to host the embedding code
In this section we’ll build a simple Windows Application that will be used to host the embedding code. The embedding code itself will make use of the Open XML SDK 2.0. As noted above these application is merely a test-harness; in a production scenario you would probably take this code and deploy it into a ‘real’ application such as an ASP.NET web app.
1.) Open Visual Studio 2010.
2.) Click on File->New->Project.
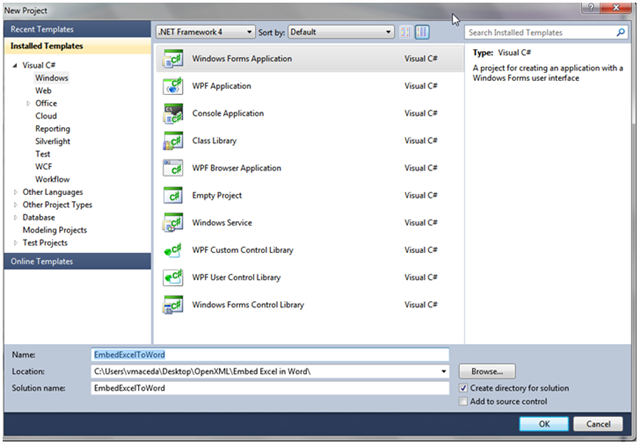
3.) Select Visual C#-> Windows and select the Windows Forms Application template and name the project EmbedExcelToWord then click the OK button.
4.) Open Form1.cs and drag four buttons onto the form as seen below:
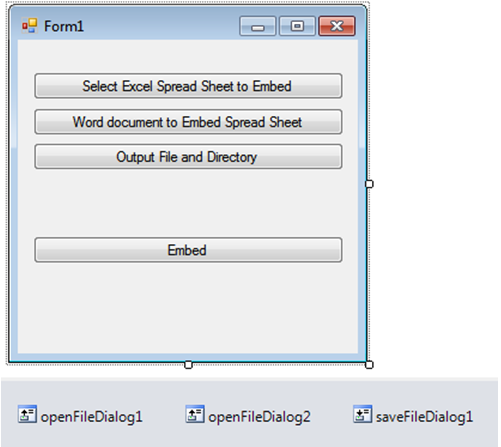
5.) Change the properties of the buttons to the following:
a. button1:
i. Name: buttonExcelSpreadSheet
ii. Text: Select Excel Spread Sheet to Embed
b. button2:
i. Name: buttonWordDocument
ii. Text: Word document to Embed Spread Sheet
c. button3:
i. Name: buttonOutputFileAndDirectory
ii. Text: Output File and Directory
d. button4:
i. Name: buttonEmbed
ii. Text: Embed
6.) Drag 2 x OpenFileDialog controls and 1 x SaveFileDialog from the Toolbox onto Form1.cs.
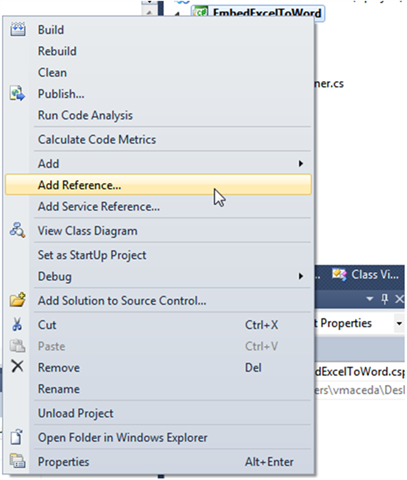
7.) Change the properties of the OpenFileDialog controls and the SaveFileDialog control to the following:
a. openFileDialog1:
i. Name: openFileDialogExcel
ii. Filter: Excel 2007-2010|*.xlsx
iii. FileName: <blank>
b. openFileDialog2:
i. Name: openFileDialogWord
ii. Filter: Word 2007-2010|*.docx
iii. FileName: <blank>
c. saveFileDialog1:
i. Name: saveFileDialogFinalDocument
ii. Filter: Word 2007-2010|*.docx
iii. FileName: <blank>
8.) Double click buttonExcelSpreadSheet and add the following line of code in the event handler:
private void buttonExcelSpreadSheet_Click(object sender, EventArgs e)
{
openFileDialogExcel.ShowDialog();
}
9.) Double click buttonWordDocument and add the following line of code to the event handler:
private void buttonWordDocument_Click(object sender, EventArgs e)
{
openFileDialogWord.ShowDialog();
}
10.) Double click buttonOutputFileAndDirectory and add the following line of code to the event handler:
private void buttonOutputFileAndDirectory_Click(object sender, EventArgs e)
{
saveFileDialogFinalDocument.ShowDialog();
}
11.) Right click the project and select Add Reference.
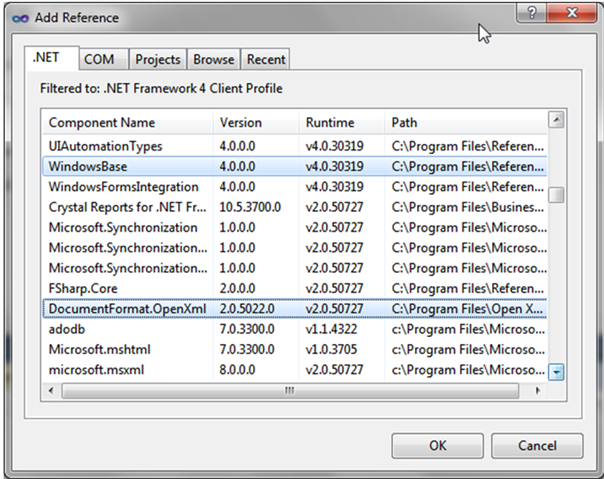
12.) In the .NET tab, hold the CTRL key and select WindowsBase and DocumentFormat.OpenXML and click the OK button.

13.) Build the project and make sure that there are no errors.
14.) Open Microsoft Paint and create an image with the following message:
15.) Save the PNG File as placeholder.png to the bin\debug directory of the project (e.g. ..\ \EmbedExcelToWord\bin\Debug).
16.) Close Microsoft Paint and go back to Visual Studio 2010. In Form1.cs’s code behind, create a method called Embed.
private void Embed()
{
}
17.) Add the following code inside the Embed method:
We create variables to hold the file locations of the Excel file to be embedded, word file template and the final Word document that has the embedded excel spread sheet.
We then create copy of the template to be our final document.
//variables to store file locations
string input = openFileDialogWord.FileName;
string output = saveFileDialogFinalDocument.FileName;
string exceldocument = openFileDialogExcel.FileName;
//create a copy of the template file
File.Copy(input, output, true);
When an object is embedded in a document, both a visual representation of the object and the underlying data is stored. The visual representation is simply an image of what you would see if you were to activate the object. In order to generate the visual representation of the embedded spread sheet we require a SpreadsheetML markup consumer that is able to determine how it is rendered; We have chosen to defer the rendering of the visual representation until it is actually opened in an appropriate markup consumer (in our case Microsoft Office).
In our solution the visual representation of the document is the Content Place holder that hosts an image (placeholder.png) that tells the users to double click the image to refresh the embedded object. When the document is ultimately opened on Microsoft Word and the user double clicks the image Word (and Excel) will gracefully generate the appropriate rendered content.
The next piece of code creates a WordprocessingML document and the main part of it. We also need to create an image part that will contain the png file to act as a place holder.
//create a word document
using (WordprocessingDocument myDoc = WordprocessingDocument.Open(output, true))
{
MainDocumentPart mainPart = myDoc.MainDocumentPart;
ImagePart imagePart = mainPart.AddImagePart(ImagePartType.Png);
imagePart.FeedData(File.Open(“placeholder.png”, FileMode.Open));
Next we create an embed object and pass the location of the Excel file for that embed object.
EmbeddedPackagePart embeddedObjectPart =
mainPart.AddEmbeddedPackagePart(@”application/vnd.openxmlformats-officedocument.spreadsheetml.sheet”);
embeddedObjectPart.FeedData(File.Open(exceldocument, FileMode.Open));
The string “application/vnd.openxmlformats-officedocument.spreadsheetml.sheet” represents the content type of a SpreadsheetML .
The next piece of code creates a paragraph that contains the embedded object. We will implement the EmbedObjectInParagraph method later.
Next we create a structured document tag block that contains the “EmbedObject “ Content Control.
Paragraph p = EmbedObjectInParagraph(mainPart.GetIdOfPart(imagePart),
mainPart.GetIdOfPart(embeddedObjectPart));
SdtBlock sdt = mainPart.Document.Descendants<SdtBlock>()
.Where(s => s.GetFirstChild<SdtProperties>().GetFirstChild<SdtAlias>().Val.Value
.Equals(“EmbedObject”)).First();
Then we create a parent element and insert the structured document tag after the paragraph. And then we save the document.
OpenXmlElement parent = sdt.Parent;
parent.InsertAfter(p, sdt);
sdt.Remove();
mainPart.Document.Save();
18.) Now we will create the EmbedObjectInParagraph method that is used in the Embed method. This method is responsible in creating an embedded object in a paragraph. To this, we will create a document and use the Open XML SDK 2.0 Productivity Tool reflector functionality to generate the code for us. Below are the detailed steps to do this:
1. Open Word 2010 and create a new Word document
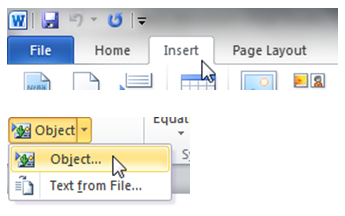
2. On the Insert tab, select Object then Object…
3. In the Object window, select the Create from File tab. Click on the Browse… button and select the Estimates.xlsx spread sheet and click on the OK button.
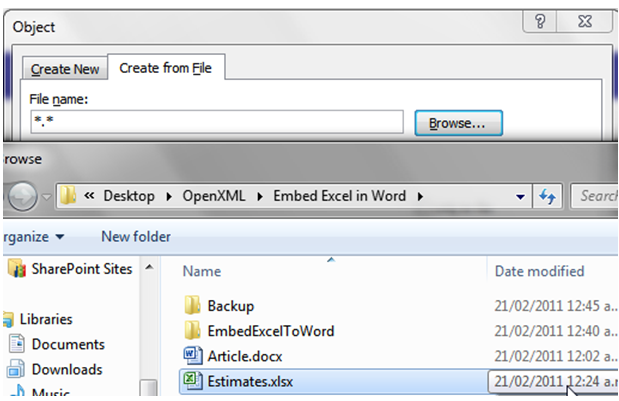
4. You will end up having a document with an embedded spread sheet as seen below:
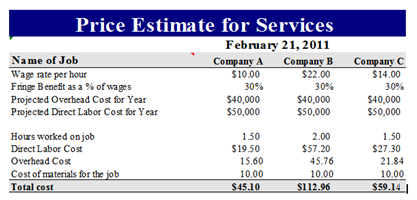
5. Save the file as Test.docx
6. If you rename Test.docx to .zip and open it in any zip application then navigate inside the Word folder there are 2 interesting folders there which is the embeddings and the media

The media folder contains an image that serves as a place holder for the embedded object.
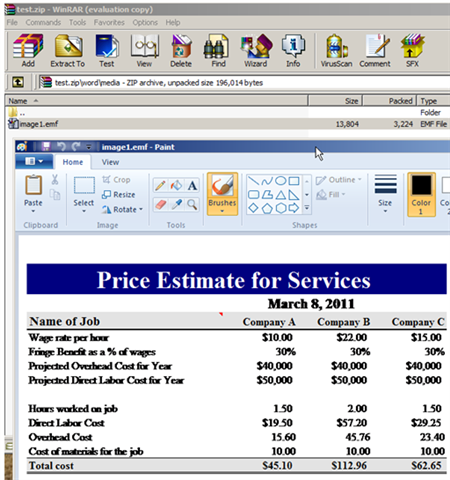
And the embeddings folder contains the spreadsheet.
7. Rename Test.zip toTest.docx and open up Open XML SDK 2.0 Productivity Tool which is found in the Microsoft Office Open XML SDK 2.0 under All Programs.
8. Drag and drop Test.docx in the Document Explorer pane
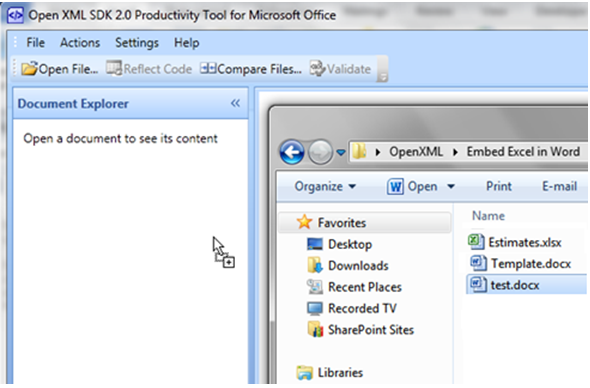
9. If we navigate to the w:document element which indicates the start of the document and down to the w:r element specifies a run of content in the parent field, hyperlink, custom XML element, structured document tag, smart tag, or paragraph there’s a w:object element which represents an embedded object.
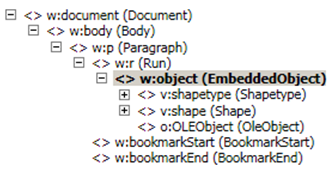
If we navigate further down, you can see a v:shapetype and a v:shape element that defines a shape template that can be used and what kind of shape it is.
If we go a little bit further, you’ll see an o:OLEObject element that references the spreadsheet.
<o:OLEObject Type=”Embed” ProgID=”Excel.Sheet.12″ ShapeID=”_x0000_i1025″ DrawAspect=”Content” ObjectID=”_1361106811″ r:id=”rId10″ xmlns:r=”http://schemas.openxmlformats.org/officeDocument/2006/relationships” xmlns:o=”urn:schemas-microsoft-com:office:office” />
10. Navigate to w:p (Paragraph)
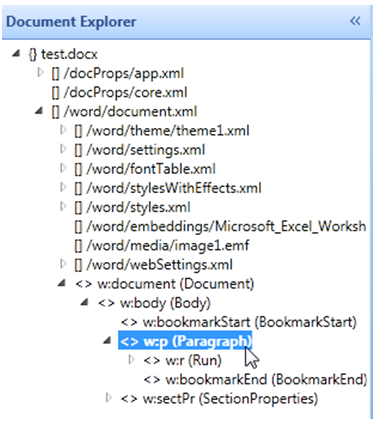
11. Right click the node and select Reflect Code

This will generate the code for both the WordprocessingML and C#.

12. Copy the code within the GenerateParagraph method
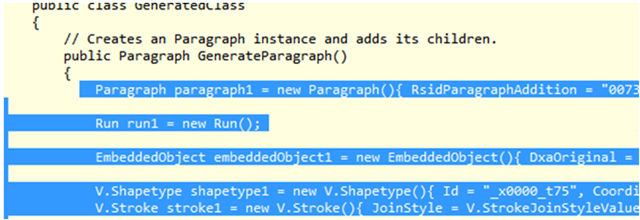
13. Go back to Visual Studio 2010; go to the code behind of Form1.cs. Create a new method called EmbedObjectInParagraph. Below is the code for the method signature:
static Paragraph EmbedObjectInParagraph(string imageId, string embedId)
{
}
14. Paste the code that you copied into the EmbedObjectInParagraph method.
15. Set the RelationshipID to imageId
V.Shape shape1 = new V.Shape() { Id = “_x0000_i1025”, Style = “width:444.75pt;height:228.75pt”, Ole = false, Type = “#_x0000_t75” };
V.ImageData imageData1 = new V.ImageData() { Title = “”, RelationshipId = imageId };
16. Set the ID for the OLEObject to embedId
<%2
